

Memorial Day! A day to remember and thank God for those who gave the ultimate sacrifice to protect my freedom. A day to celebrate. My dad and my grandfathers and my husband’s father all served in the armed services. Thankfully, none of them gave their lives, although my grandfather’s ship was hit by a Kamikaze plane and many men died. They served and were proud of their service. They have all passed away now and I remember them and their bravery on this day.

On Memorial Day, Yes!Chef! and I were in Lake Tahoe for the long weekend. None of the kids were with us…just the dog. So, we headed down to the store to pick out something to grill. We still had some sweet corn on the cob and a couple of onions. So, he decided to make some grilled corn and onion rings. I wanted him to grill some burgers because he makes awesome burgers.
When we got to the store we were surprised to see that it wasn’t very crowded. In fact, there was hardly anybody there. Well, that was okay with YC! because he got exactly what he wanted and he was able to talk to the butcher and ask him to grind up some meat for us. Now, I have to take a moment a make a plug for your Grocery Store Butcher. My youngest worked in the meat department in a local grocery for about 6 months before they laid him off due to the economy. During that time, YC! and I learned to appreciate the butcher. They will tell you the best cuts of meat for what you want to do, they will give you recipes for items on sale, they will help you look for good pieces of cut meat. In the above case, Yes!Chef! wanted to have freshly ground hamburger, so he had the butcher help him choose a chuck roast that was nicely marbled. And, because the store was quite empty, the butcher had the meat ground up within minutes even though he told us to continue shopping and come on back when we were done. AND…if you want hamburger…go to your butcher and get it freshly ground from a chuck or brisket. The more marbling, the more flavor. I am telling you there is a huge difference between freshly ground beef from a chuck or brisket and the ground meat that is packaged. Yes!Chef! prefers to grind his own meat, but we don’t have a grinder at the cabin.

We also delved into the bakery to find some fresh bread for the hamburgers we were intending to make. This Ciabatta bread was soft inside, but firm and little crusty on the outside…perfect for the hamburgers.

When Yes!Chef! thought is was time to get cooking, the first thing he did was his prep work. He chopped and minced and got things out of the refrigerator to come to room temp.

After that, he mixed together the compound butter. I don’t really have a recipe for this because he makes it different every time depending upon what he is going to do with it and what the other dishes are. In this case, he was making it for the sweet corn. So, he used unsalted butter, minced onion, lime zest (apparently the theme for the weekend was lime!), lime juice, salt and Cayenne. This was to taste. He knows I don’t like a lot of “kick”, so he didn’t put a lot of Cayenne in it, but enough to know it was there.
Then, he went outside to start the barbecue. It is always a challenge to keep a charcoal barbecue going at 7,000 foot elevation. It frequently goes out just when you go back inside to work on more food. This is one of the reasons we use this little chimney. It was our lucky day on Memorial Day and the charcoal decided to light up and stay lit.

Yes!Chef! kept an eye on the charcoal and also went back into the kitchen to continue the cooking. He had put some onion rings into a buttermilk and spice mixture earlier in the day, so he brought that out to bread and fry up.

In this case he used a flour and cornmeal mixture to give it an extra crunch.

Yes!Chef! calls them “O Rings” for some reason. As an aside, he has lots of pet names for lots of things. I think I’ve only heard him use my actual name 5-6 times in our entire marriage of 28 years. He normally refers to me as “Dear”. He calls his daughter “Shorty” even though she is 5’7″ (taller than me) or Pumpkin. He calls both of his sons “Son” or “Dude”. He also has pet sayings that we (his fam) call “Corby-isms” (which is his name)….”O rings” is one of his Corby-isms.
After he breaded up the “O Rings”, he put them in some hot oil to fry them up.

Then he sprinkled a little Kosher salt on them and put them in the oven on low heat to keep warm.

Here’s a close-up look at the fabu “O Rings”.

After that he mixed up some Greek Yogurt, Cayenne and other spices for a dipping sauce for the O Rings. (It was spicy!)

Y!C! does not season his hamburger patties until they are well formed and ready to cook. Then he liberally applies Kosher salt and black pepper. That’s it! No additives to the burger. When you grind your own meat (or ask the butcher to grind it) it has such a meaty texture that you will not need any other additive.
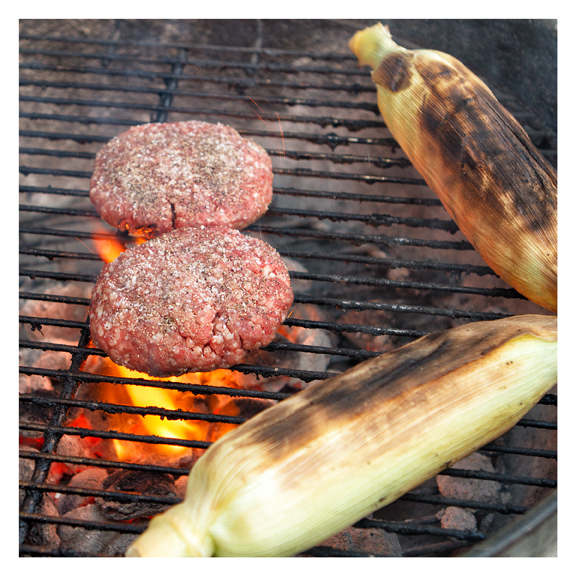
He had already soaked the corn (in the husk) in a pot of water to absorb some moisture and put a couple on the grill (in their husk.)

Grilling makes Yes!Chef! happy.


- Y!C! moves the burgers around a little so they don’t get scorched

And then it was ready!

Will you look at that! The hamburger was juicy, meaty and perfectly seasoned. I didn’t even put any mustard or mayo or ketchup on the burger. The Ciabatta was sweet and soft and not too much bread. The corn was very sweet for this time of year…surprising. The compound butter brought out the sweetness of the corn and had a tang of lime. (Have I told you before how much I like lime on my corn? What? Oh, I guess I have.)
The O Rings were crunchy on the outside and sweet and tender on the inside. The dipping sauce was zippy (a little hot for my taste) and creamy. This was a simple dinner with simple, fresh ingredients, but it did involve quite a bit of cooking and preparing. Yes!Chef! told me that he likes the process of preparing the food almost as much as the eating of it…Almost!
Here’s the recipe for the O’Rings provided by Simply Recipes.
Onion Rings
Ingredients
- 2 large yellow onions, peeled, sliced into 1/2-inch to 3/4-inch thick ringed slices, rings separated
- 2 cups buttermilk, or 1 cup plain yogurt mixed with 1 cup milk
- Salt
- Freshly ground black pepper
- 1 1/4 cups all-purpose flour and 1/4 cup cornmeal OR 1 cup prepared cornbread flour plus 1/2 cup all-purpose flour
- 2 or 3 cups of grapeseed oil, or other high smoke-point oil such as canola oil or peanut oil
Equipment needed: a 5-quart heavy-bottomed dutch oven, tongs, candy thermometer, paper towels, cookie sheets
Method
1 Combine the buttermilk (or yogurt and milk) with 1 1/2 teaspoons salt and 1 teaspoon black pepper in a large bowl. Add the onions to the buttermilk mixture and coat thoroughly. Let sit at least 15 minutes.
2 In a separate bowl combine the flour and cornmeal, 1 teaspoon of salt and 1/2 teaspoon of pepper. Set aside.
3 Add the oil to a largish Dutch oven pan – about 5-quart or 6 quart size. Make sure that the pan is absolutely dry inside before you add the oil. Any water droplets in the pan will cause the oil to splatter violently as it heats up. The oil should create a layer anywhere from 3/4-inch to an inch thick. Use more oil if necessary. Heat the oil to 350°F. Use a candy thermometer to measure the heat of the oil. You may need to tilt the pan in order to cover the thermometer’s sensor completely and get an accurate reading. I have found some instant-read thermometers to be useless for this purpose as their sensors are 2 1/2 inches up from the bottom. A good old fashioned metal-encased thermometer works best.
Be very careful whenever handling hot oil. No running kids in the kitchen. No distractions. Do not answer the phone if it rings. Pay attention. Have the pan’s lid close by.
You can test if the oil is ready by moistening a little bit of the flour and dropping it in the pan. If it sizzles and fries, it’s ready. If it burns, take the pan off the heat and let the oil cool down a bit.
4 Working in batches, lift some onion rings out of the buttermilk and coat them in the flour mixture. Use tongs to place them one by one in the hot oil. Fry for a minute on each side, until golden brown. Do not crowd them. Place finished onion rings on a cookie sheet lined with paper towels to absorb the excess oil. Keep the complete onion rings warm in a 200°F oven while you fry the rest. Between batches, if you end up needing more oil, add some. Let the temp get back up to 350°F before starting the next batch.
Serve hot.
Note: It’s best not to pour the leftover oil down the drain. Better to pour into an extra empty jar, and discard with your trash.
Simply Recipes http://simplyrecipes.com
Yes!Chef!’s O’Ring Spicy Dipping Sauce
- 1 cup Greek Yogurt
- 1/4 cup chili sauce
- 1 teaspoon chili powder
- 1/8 teaspoon cayenne pepper
Mix it all together and put it in the fridge for a while.
Yes!Chef! thinks he may have used a little more cayenne, but it was very spicy, so for the recipe, he cut it back
If you want to follow Yes!Chef!’s recipes on Pinterest. Go for it! How’s about Facebook? My photography can be found here.

What ship did your grandfather serve on? My Dad served on the USS Tennessee BB43 in WWII. He didn’t talk a lot about what he went through but did tell me his ship was bombarded one night when he just came off his shift/watch, and where he had stood ( he was a gunner) just minutes before the buddies who replaced him and others were all killed. So when you said your grandfather was in navy aboard a ship it struck a nerve. If not for that generation none of would even be here. My Dad died June 21, 2001 three weeks before his 77th birthday, he would of been 88 this year in July.
We all owe them more than just our gratitude. We owe them our lives.
I can’t remember off hand what ship he was on, but he, like your dad, had just gotten off duty when the plane hit where he had been minutes before. I know he rushed in to try and save some of the men. I also know that the ship limped back to port in Hawaii, but I’m not sure when. My grandfather and my dad joined the navy at the same time, leaving my grandmother home alone to hold down the fort. He was 38 and my dad was 18 when he went into officer training at Cal Berkeley and then served as a navigator in the South Pacific. Men like these and your father deserve our gratitude and honor. Thank you for stopping by.
Beautiful plate! The ciabatta bread sounds like a wonderful idea for a bun and the corn looks amazing.
Oh, you should try the Ciabatta bread with the hamburger. It is much more tasty and satisfying than a hamburger bun. And if you haven’t tried freshly ground burger, try that, too! Thanks for stopping by.
I will for sure next time. I’ve been thinking about making my own buns, but never seem to plan it out right so I have enough time.
We’ve been grinding our own beef since I got a grinder/stuffer for Christmas. haven’t found our perfect blend yet. The last batch was 3:1 chuck and short rib. I think next time I’m going to go about 1:1 chuck to brisket to see how that works out.
Looking forward to reading more of your blog.
Thanks! We haven’t tried blends yet, but Y!C! Says that he likes brisket best. I found a recipe for ciabatta bread that I may just have to make!
When I finished reading, there was a puddle of water on my desk. Wait! Was that my drool?
🙂
hahaha…that gave me a laugh. You should try it! Thanks for stopping by.
When I finished reading, there was a puddle of water on my desk. Wait! Was that my drool?
🙂
Oh, my, what a wonderful meal! I believe we are probably the only people in America without a grill. Your photos are making me rethink that.
Gosh, how can you survive? Heh. Grills are great, but Y!C! says that he thinks you can get more caramelization in the heavy iron skillet. And caramelization equals flavor.
again another beautiful post. Thank you and i did the pasta with extra salt today inspired by your blog! the family loved it
Oh, I’m so happy. It seems counter-intuitive, but the salty water plumps up the noodles and infuses flavor into them. I’m going to blog on his spaghetti one of these days because he has a few other tricks up his sleeve which are easy and quite flavorful.
i can’t wait!
I have to make those onion rings. They look devine. I often have trouble keeping my charcoal grill going at 8000 feet. I thought I was just inept but I guess it is an altitude thing! Cheers!
We have always struggled with keeping the coal going in Tahoe and our cabin is about 6800 feet. I remember my dad becoming so frustrated every time he grilled something. My mom would fuss over making sure the rest of the food was ready at the same time the grilled food was ready and it would totally stress my dad out because he could never predict when the grilled food would be done. The chimney really seems to help keep the coals going. The O’rings were wonderfully crispy but the breading didn’t stick as nicely as YC! would have liked. They tasted great, though.
Another great post!
Thank you so much!